Tutorial
This page is designed to help you quickly and easily find the information you need. It provides a step-by-step guide on how to use the various features, ensuring an optimal user experience.
Select Search Strategy
Option A: Direct Gene Search
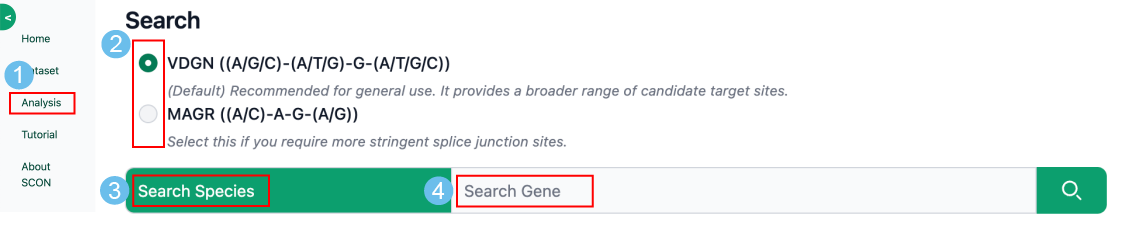
1. Select splice junction type:
These strategies define the specific junction sites where the SCON (189-bp short conditional intron) will be inserted.
VDGN (Default)
The SCON is inserted between VDG | N.
- V: A, C, or G | D: A, G, or T | G: Guanine | N: Any nucleotide
MAGR (Stringent)
The SCON is inserted between MAG | R.
- M: A or C | A: Adenine | G: Guanine | R: A or G
2. Search Target:
Input the Species name (e.g., Mus musculus) and enter the official Gene Symbol (e.g., Alb, Sox2).
Tip: Use the auto-complete suggestions to ensure correct genomic data assembly is loaded.
Option B: Browse Dataset
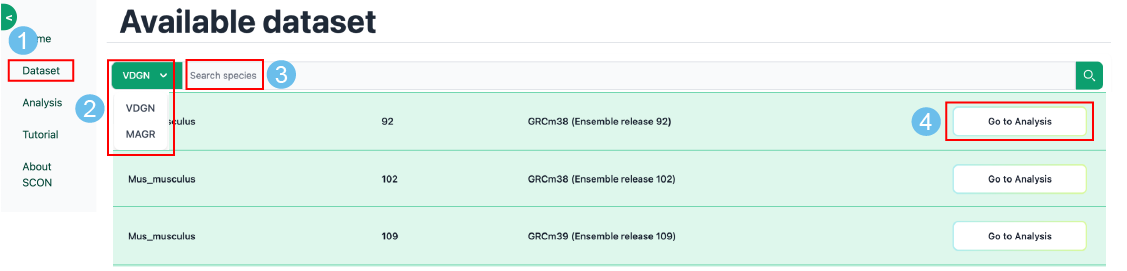
•
Browse Dataset:
Alternatively, navigate to the Dataset menu to filter by Species and Ensembl release version. Clicking Go to Analysis on your preferred version will directly take you to the "Analysis" session with the pre-selected parameters.
Identify candidate sites

•
SCON Targetable Sites Table:
This table serves as a map for your target gene. It lists every known transcript and identifies which exons can be modified using the SCON system. Click on a specific number in the transcript columns to load the detailed sequence and gRNA design options. You can also click on any Transcript ID in the table header to be redirected to the Ensembl website for in-depth information.

•
Exon Info Overview:
Once a specific exon-transcript combination is selected, the Exon Info table provides a comprehensive profile of the target exon's genomic properties. The Exon Usage score indicates whether the exon is consistently included across all transcripts for that gene. We highly recommend prioritizing exons with a score of 1, as these are constitutive exons ensuring a more robust knockout effect across all protein variants.
Column Descriptions:
- ■
Gene / Transcript / Exon: Identifies the specific genomic features currently under analysis.
- ■
Exon Usage: Binary indicator (0 or 1) of exon presence across all isoforms.
- ■
Exon Size / Strand: Length of the target exon in bp and its orientation (1 or -1) on the chromosome.
- ■
Chromosome / Exon Start / End: Precise chromosomal coordinates of the selected exon.
- ■
Cumulative CDS Size / Total Coding Size: Length of the coding sequence up to the current exon and for the entire transcript, useful for mapping functional protein domains.
Evaluate and Select gRNAs

•
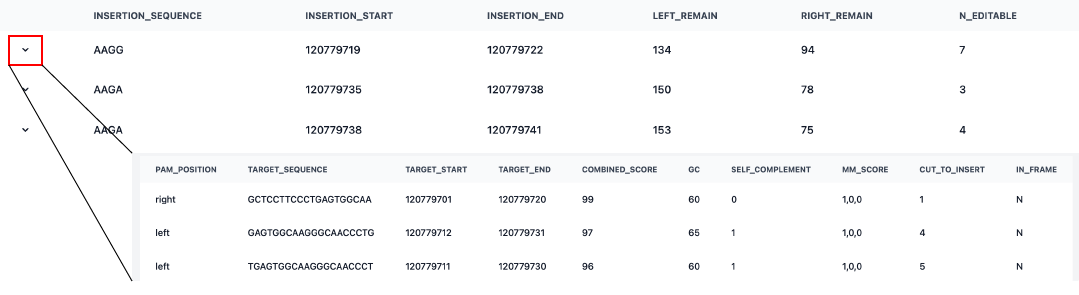
Sequence Browser:
The Sequence Browser provides a high-resolution visualization of the SCON insertion site. Black bars represent the SCON target site (MAGR or VDGN), while Emerald highlights indicate the PAM (Protospacer Adjacent Motif) sequences. This allows you to visually verify the spatial relationship between the CRISPR cut site and the intended intron insertion point.
•
Detailed Site Analysis:
Below the browser, you will find a summary table where each row corresponds to the target bars (black/emerald) shown in the sequence. Click the downward chevron on the left side of a row to expand the detailed sub-table. This provides comprehensive data for each gRNA candidate, offering direct assistance in selecting the most reliable targetable site. To assist your selection, we provide a Combined Score that weights parameters such as MM_score, GC content, Distance from cut, and the In-frame compatibility. While a higher score generally indicates a better-optimized design, you should evaluate each parameter based on your specific experimental goals.
[Caution!] We offer candidate information as a reference, but please note that the Combined Score results have not been experimentally verified. You can customize the filters depending on your priorities and interests.
Column Descriptions:
- ■
Insertion_sequence: The specific genomic sequence at the junction where the SCON is inserted. This is used to design the homology arms for your donor template (ssODN).
- ■
Insertion_start / End: The exact chromosomal coordinates where the SCON will be inserted into the genome.
- ■
Left_remain / Right_remain: The length of the remaining exon sequences on the left and right sides of the SCON insertion site. These values are critical for ensuring the structural integrity of the flanking exons.
- ■
n_editable: The total number of unique sgRNAs available to target this specific insertion site.
- ■
PAM_position: The Protospacer Adjacent Motif (NGG) and its location (Left or Right) relative to the target sequence.
- ■
Target Sequence: The 20bp guide RNA (sgRNA) sequence.
- ■
Target_start / End: The chromosomal coordinates where the gRNA actually targets and cuts the DNA.
- ■
Combined Score: An integrated ranking metric that evaluates gRNA performance by balancing multiple critical factors.
It computationally weights Specificity (minimizing off-targets via MM_score, max 30), Efficiency (optimal GC content, max 30 and low self-complementarity, max 10), and Knock-in Precision (prioritizing shorter distance from cut, max 20). This score helps you identify candidates that maximize successful SCON insertion while ensuring an effective gene knockout even if alternative splicing occurs. (In-frame status, max 10).
- ■
GC Content (%): The percentage of G and C nucleotides in the sgRNA. The optimal range for efficiency is 40% – 60%.
- ■
Self_complement: A score predicting the likelihood of the sgRNA forming internal hairpin structures. Lower scores suggest better activity.
- ■
MM_score (MM0, MM1, MM2): The number of genomic sites with 0, 1, or 2 mismatches. Lower counts (ideally 1, 0, 0) indicate high specificity.
- ■
Distance from cut: The distance (bp) between the CRISPR cut site and the SCON insertion point. Note: Shorter distances typically lead to higher knock-in efficiency.
- ■
In_frame (3N): Indicates whether the insertion length maintains the triplet codon frame, helping predict functional stability during alternative splicing.
Export Experimental Design
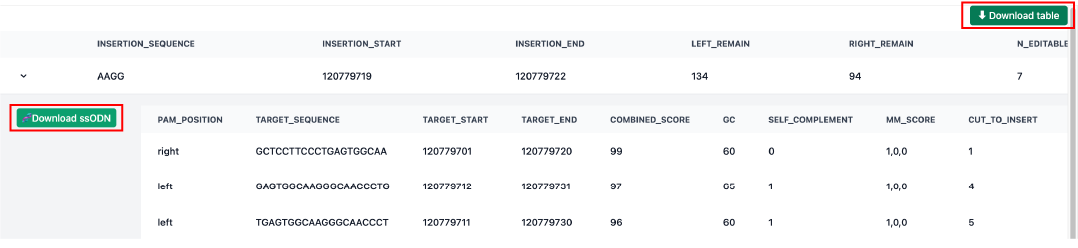
•
Download ssODN:
Once you’ve selected the optimal site, click the 🧬 Download ssODN button to get the final donor sequence (Left arm + SCON + Right arm) for your knock-in experiment.
•
Full Report:
Use the ⬇ Download Table button to save all candidate data for your records.